help and notes
Input what you need to, choose the results you want
There are many ways to hang pictures depending on fastening methods available, personal preferences, tools and equipment etc. These can range from simple arbitrary placement, use of centerlines, center points or edges; and may use simple tools like a spirit level and tape measure, or precision location using lasers. All are perfectly valid methods.
If you consult YouTube or an AI Chatbot, chances are you will get complicated instructions often involving lots of painter's tape and placing mock-up layouts on the wall. I think these are often unnecessary and wasteful.
The approach I prefer is to simply lay the works out in front of the wall, or on the floor, then arrange and rearrange until the set feels right. Maybe so that no one piece dominates and there is an appealing distribution of content, colors and tones etc. After that, do a sketch on paper with key parameters, like alignment heights, inter-work and end spaces. These will set the framework. As a reference the center point (mid-line alignment height) is generally suggested to be 57 inches or 1450 mm high. Spacing between works will be closer in clustered works - perhaps 3 inches or 80 mm, but wider to expansive layouts. Centerline and other key positions are useful to mark on the wall with tape, eg. to mark golden ratio positions (eg. with scratchpad calculator's length/phi) etc.
Then measure the works. Three or four measurements may be needed for each artwork:
vertical:
1) outer vertical height
2) drop to fastener(s)horizontal:
1) outer horizontal width
2) inside adjustment to fasteners (if using more than one)
Other distances used for positioning: vertical height on wall; horizontal inter-work or first/end spacing (ie. to previous edge); and, vertical inter-work spacing for a vertical group. Armed with these measurements, use the calculator to determine fastener positions.
All this can be done without sticking mock-ups on the wall. Painters tape is super useful for marking start and end points, reference heights, and center points. But, there is no need to cover a wall with it. All the work can be done with a pencil, tape measure and spirit level (ideally one with a measurement scale on it).
I hope the calculators can be used to make relevant and helpful calculations for your purposes.
Use the main calculator, or use solo to install works one by one in any position. Just complete inputs you need, eg. for horizontal or vertical measurements. For specific measurements use horiz to calculate horizontal spacings and for vertical groups use vert button. Then choose the results you want.
Have fun!
- horizontal layouts
use main form
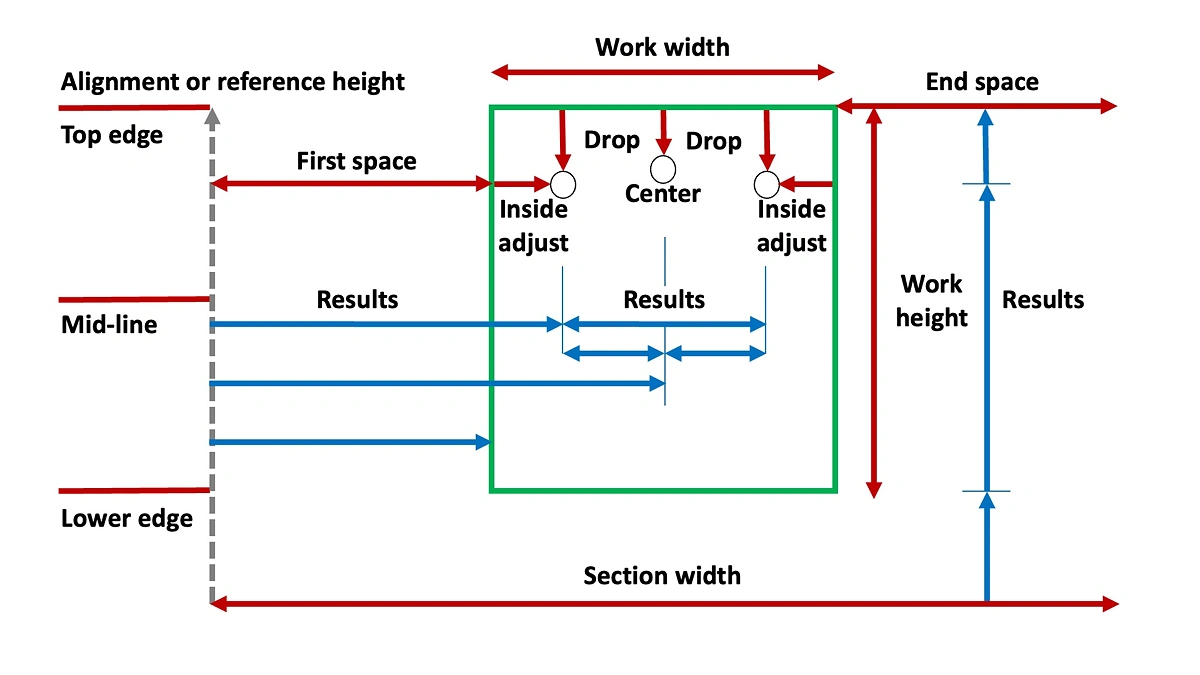
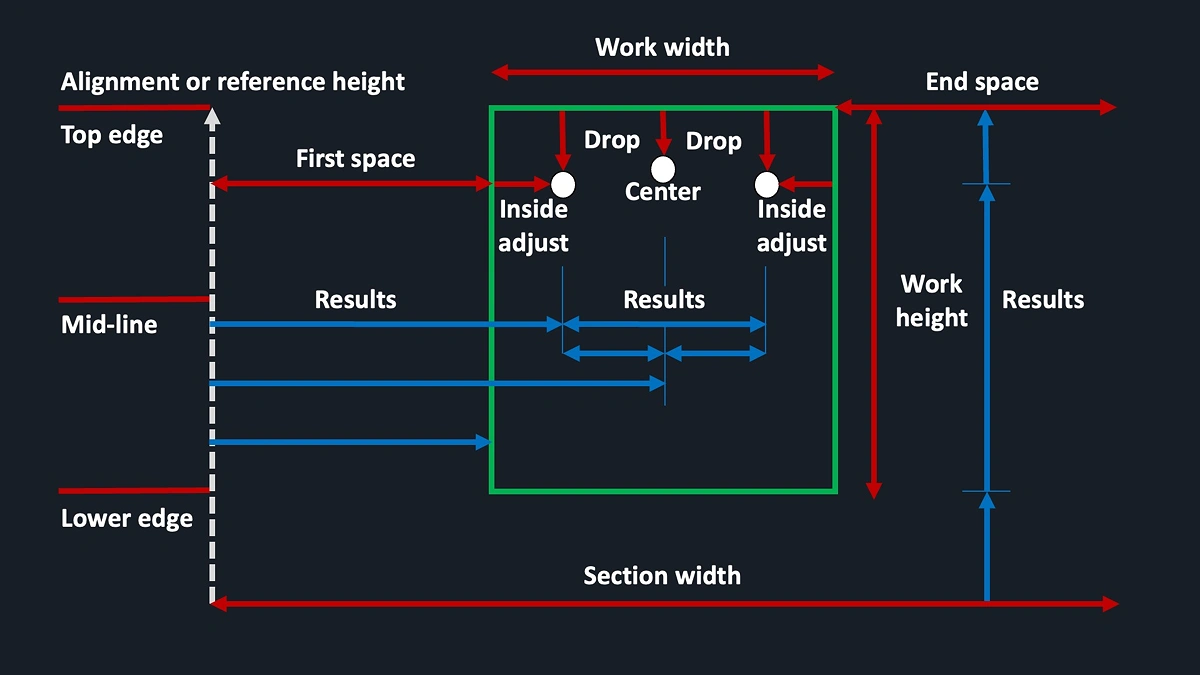
step 1: decide overall setup
- complete step 1 overall wall setup, to document layout parameters: input the height of your chosen horizontal alignment, i.e. as used in step 3: A. mid-line (eyeline, eg. 57" or 1450 mm), B. top edges or C. lower edges aligned (measurement results are provided for each of these options in a table in step 3) and input width of wall or section of wall, and the number of works on the wall or section
step 2: determine horizontal spacing
determine horizontal spacing in step 2. The widths of all works (ie. work positions) need to be entered. If your hanging will include multiple frames vertically in a single work position use the width of the widest work as that work position's horizontal width. Use the
vertbutton for works within the vertical groupfor your specified wall section results show measurements for symmetrical layouts
first, including first/end spaces: 1) an even spacing distance which includes first/end spaces as well as inter-work spaces; and 2) calculated even first and end spaces with a specified inter-work distance; or 3) calculated even inter-work space with specified first / end distance
second group, not including first/end spaces. This is useful as sometimes a group of works can be considered like a single work in the overall layout: calculation 4) ignores section width to determine the width of the group of works specified in steps 1 and 2 using a set inter-work space and zero first/end width. Calculation 5) allows a target group width to be set and required inter-work space is shown
step 3: install works
use step 3 individual work calculations: for each work to obtain both vertical and horizontal hanging measurements (or the
vertbutton for a vertical group position). Input all information requiredinclude your set first / end space or calculated even inter-work space with set first / end space, or use any arbitrary spacing you desire (eg. if uneven or specified spacing is required)
drop to fastener will be either: distance from frame top to taught hanging wire, or to inside top of D-rings where the hook would sit (if height of two fasteners is uneven just do two drop calculations). It might also be the stretcher width if simply hanging on nails or screws. Drop to fastener can be a negative number, eg. if using pins in cloth tape
inside adjustment is either to D-ring centers or some set distance if hanging on nails, screws, or other fasteners like pins
finally expand the appropriate table tab for the alignment method chosen to see the correct results. For each work repeat data entry in step 3. Note that one section of wall may use more than one alignment method, e.g. if you want two rows of works with one top aligned and the other lower aligned. If so, I recommend calculating rows in separate operations using the pdf template to record relevant measurements
hang each work one by one according to the calculated measurements; ensure each work is hanging horizontal with a level before proceeding
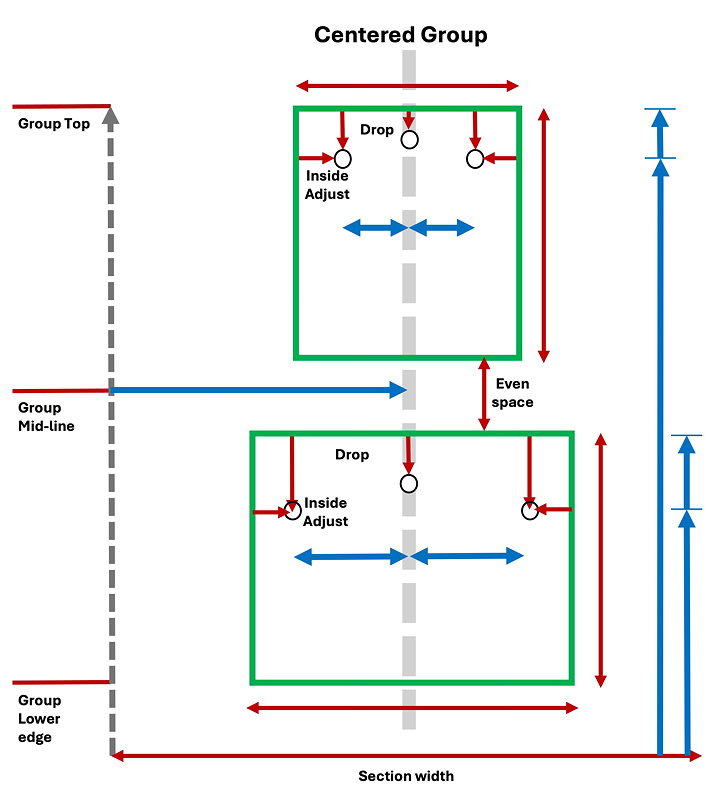
- vertical groups
use vert button
a pop-up lightbox form provides results for a single vertical group where works in a section are either centered or edge aligned
both vertical and horizontal measurements are given. Only enter inputs for as many works as required up to a maximum of six.
centers aligned
for center aligned groups a group section width needs to be set distance to establish a centerline. This may be arbitrarily set, or if the group is part of a larger array, may be the width of the widest work plus twice the set inter-work space
vertical heights for the top of the works and/or their fasteners are calculated and this method places fasteners horizontally relative to the centerline
inputs (in red) and results (in blue) for both vertical and horizontal measurements are shown in the diagrams below
edges aligned
for these calculations the group's vertical edges are to be aligned to the left or right. The alignment can be the edges of the works or at a set the distance from the previous (or next) work's edge. The edge to center and to 1st fastener results will include this additional distance if entered into the optional input
vertical heights for the top of the works and/or their fasteners are calculated and this method places fasteners horizontally relative to the desired edge.
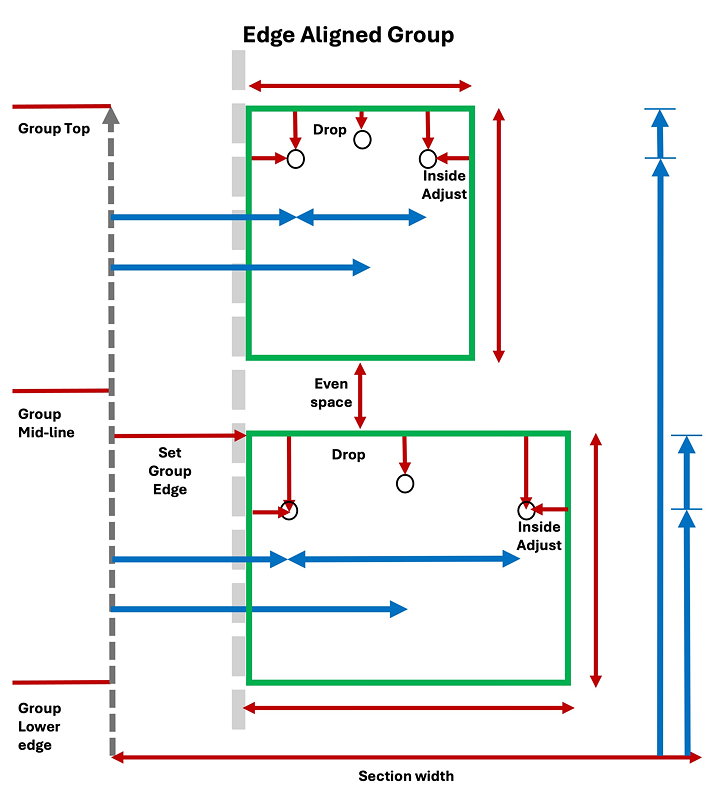
If there are multiple vertical groups whose height must be matched, then vertical inter-work space should be adjusted so each group has the same height. To match multiple groups to a target height, first determine the overall group height for the tallest group with its minimum/set even vertical space. This will set the target height. Then for the remaining vertical groups enter their data and determine a new even vertical space. Finally, adjust the even vertical space to update that group's results
note that entries in the lightbox forms will remain until cleared so you can move back and forth between the lightbox and the other forms on a page
- individual works
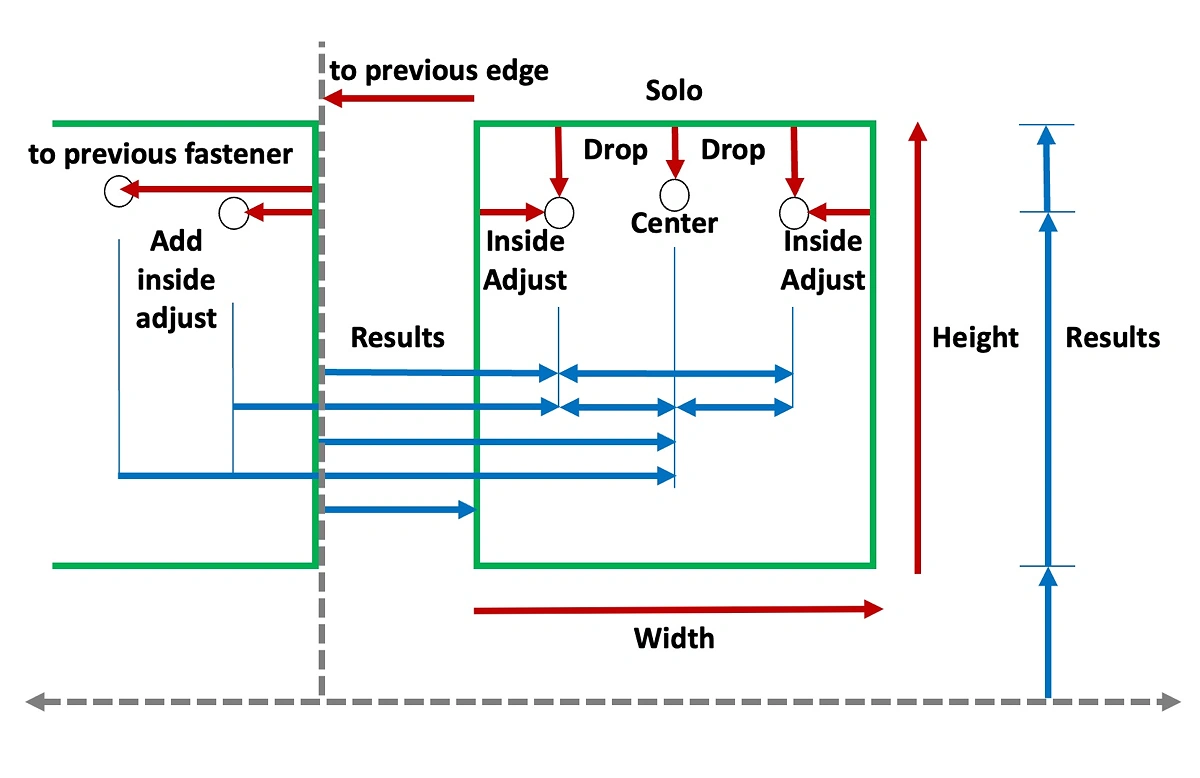
use solo button
a pop-up lightbox form asks for all the inputs you need and provides all the results required to hang a single work
enter data into the inputs section, ie. a work's chosen reference height and other details. The results are shown for vertical height options (ie. top edge, mid-line or lower edge at the reference height level) and relevant horizontal measurements for one or two fasteners
you can use the main form or
horizbutton to determine horizontal spacing. You can then use solo for each work in turn using the calculated horizontal space as the "to previous edge" entryWorks can also be placed arbitrarily or after pre-planning the set-up. For pre-planning solo results can be printed out with notes
soloalso includes an option to measure fastener positions from a previous work's last fastener. This is useful if you want to place fasteners before hanging the works. To use this feature add the inside adjustment for the previous work to the solo calculator. This allows you to measure from the previous work's last fastener, and this can sometimes speed up the process. For example, using a level with a measure scale, one end can be rested at zero under the previous work's fastener and the horizontal distance to the solo work's first or center fastener can be read and marked quickly.
step 2: install works
starting at one side, hang works one at a time repeating the process for each work. Ensure each work is hanging horizontal with a level before proceeding
If using the option to measure from a previous work's fastener do that before hanging the previous work
note that entries in the lightbox forms will remain until cleared so you can move back and forth between the lightbox and the other forms on a page.
- calculator with scratch pad
- use buttons like a calculator, or math expressions can be entered directly into the result area by clicking/tapping it and using a keyboard (the area has multiple lines for long expressions), then when ready press blue
=button - hint: you can also enter your measurements or calculations into the temporary notes area and then copy and paste them into the result area. This is useful to keep track of, or reuse, your measurements and calculations
- calculator uses mathjs library and can parse and evaluate expressions using many units and constants, eg. feet, inch, m, cm, mm, kg, lb, degF, degC, mean, std, pi, phi, sum, sqrt, ^, %, !, e, trigonometric, bin, hex, etc. For more information: mathjs.org units
- order of operations:
- parentheses
- exponents
- multiplication and division
- addition and subtraction
- same precedence (like * and /) are computed from left to right
- usage examples include:
- do basic picture hanging calculations such as:
alignment_height+(picture_height/2)-drop_to_fastenerfor mid-line alignment height, orsum(alignment_height,picture_height/2,-drop_to_fastener); - find the longer "golden ratio" length, eg. to locate a mid-point for an off-center work or group in a wall section, enter:
length/phifor any height or width - determine the location on a floor at 90° from a wall point, calculate the hypotenuse side of a right angle triangle enter
sqrt(first^2+second^2)a closing parenthesis needs to be added; - conversions for hardware, wires etc. use
to, eg. convert feet/inches to mm enter#inch to mmor#feet +#inch to mm, or#kg to lb
- do basic picture hanging calculations such as:
- use clear button to delete notes. Temporary notes will also be cleared on exiting page or app
- copy button allows copy and paste to another application. External notes can be pasted into scratch pad using OS paste function
- decimal calculations done in javascript sometimes produce results with many decimal places - these inaccuracies can be ignored, or results rounded manually
- use buttons like a calculator, or math expressions can be entered directly into the result area by clicking/tapping it and using a keyboard (the area has multiple lines for long expressions), then when ready press blue
- PDF templates
- PDF template for hardcopy or as a background in your notes app so you can plan ahead. Use in split screen to scribble measurements. Download button in viewer top bar
- PDF template to collect artwork dimensions and measurements in preparation for using hangcalc. Download button in viewer top bar
- app information
this is a progressive web app using javascript for calculations. Install it using your web browser, e.g. in Chrome-based browsers use "Add to Home" or "install app" and in iOS "Add to Home Screen"
use AC button to clear inputs, exiting page or app will also clear all data
The software is provided as is, without warranty of any kind, express or implied. In no event shall the authors or copyright holders be liable for any claim, damages or other liability.